Dear Friends,
You can change the location of an item (textbox, button, comboBox, etc) on the form by
using this command.
ItemName.location = new point(x,y)
Note: X => X-LOCATION (HORIZONTAL LOCATION)
Y => Y-LOCATION (VERTICAL LOCATION)
Friday, June 13, 2008
HTTP REQUEST TAG
By Implementing httpruntime tag I solved a webservice problem. Problem was that a report was not displayed and show me a time out error. By implementing this problem was resolved.
<\httpRuntime> Element
<\httpRuntime> Element
Configures ASP.NET HTTP runtime settings. This section can be declared at the machine, site, application, and subdirectory levels.
<\configuration>
<\system.web>
<\httpRuntime>
            maxRequestLength="size in kbytes"

            executionTimeout="seconds"

            minFreeThreads="number of threads"

            minFreeLocalRequestFreeThreads="number of threads"

            appRequestQueueLimit="number of requests"

            versionHeader="version string"/>
Optional Attributes
| Attribute | Option | Description |
|---|---|---|
| appRequestQueueLimit | The maximum number of requests that ASP.NET will queue for the application. When there are not enough free threads to process a request, the requests are queued. Incoming requests will be rejected with a "503 - Server Too Busy" error when the queue exceeds the limit specified in this setting. | |
| executionTimeout | Indicates the maximum number of seconds that a request is allowed to execute before being automatically shut down by ASP.NET. | |
| enable |
| Specifies whether the App Domain is enabled. at the current node and at the child node level. The default value is true. |
| true | Specifies that the App Domain be enabled. | |
| false | Specifies that the App Domain be disabled. The application is not loaded in memory and any client request will cause a 404 error to be issued. | |
| idleTimeOut | Specifies the App Domain idle time before it is shut down. The default value is 20 minutes. | |
| enableKernelModeCache | Specifies whether output caching is enabled. At this time, this attribute is only relevant when IIS version 6.0 or later is installed. The output caching configuration and type of request determines whether content can be cached. In order to cache a response, the following criteria need to be met:
| |
| true | Specifies that caching be enabled. | |
| false | Specifies that caching be disabled. | |
| maxRequestLength | Indicates the maximum file upload size supported by ASP.NET. This limit can be used to prevent denial of service attacks caused by users posting large files to the server. The size specified is in kilobytes. The default is 4096 KB (4 MB). | |
| minFreeLocalRequestFreeThreads | The minimum number of free threads that ASP.NET keeps available to allow execution of new local requests. This number of threads is kept reserved for requests coming from the local host, in case some requests issue child requests to the local host during their processing. This avoids a possible deadlock with recursive reentry into the Web server. | |
| minFreeThreads | The minimum number of free threads to allow execution of new requests. ASP.NET keeps this many threads free for requests that require additional threads to complete their processing. | |
| useFullyQualifiedRedirectUrl | Indicates whether client-side redirects are fully qualified (in {HYPERLINK "http://server/path" } form, which is necessary for some mobile controls) or whether relative redirects are instead sent to the client. | |
| true | Specifies that client-side redirects need to be sent fully qualified. This is achieved by automatically converting all redirects that are not fully qualified to fully qualified form. | |
| false | Specifies that client-side redirects do not need to be automatically converted to the fully qualified form. false is the default. | |
| versionHeader | Specifies the value of a version header that ASP.NET sends with every response. This attribute is used by Microsoft Visual Studio .NET to determine which version of ASP.NET is in use. It is not necessary for production sites and can be disabled either by removing the attribute from Web.config or Machine.config, or setting the attribute to an empty string (versionHeader=""). |
Example
The following example specifies HTTP runtime parameters for an ASP.NET application.
<\configuration>

  <\system.web>

     <\httpRuntime maxRequestLength="4000"

        useFullyQualifiedRedirectUrl="true"

        executionTimeout="45"

        versionHeader="1.1.4128"/>

  <\/system.web>

<\/configuration>
Requirements
Contained Within: <system.web>
Web Platform: IIS 5.0, IIS 5.1, IIS 6.0
Note: Please remove "\" forward slash from the tags.
This article is copied from the following url: http://msdn.microsoft.com/en-us/library/e1f13641(VS.71).aspx
Friday, April 18, 2008
Learn How to Write Good Documentation for your Software
The ideal software would be free of errors and so easy to use that everybody would be familiar with it the minute they start the application. However, this is not the case in real life.
Besides the quality of the software product, there’s something else that makes or breaks the deal: technical support. The better the support software publishers and shareware authors provide, the more users are likely to buy the product.
Technical support for software products can be provided in several ways:
- online product documentation
- e-mail assistance
- access to support forums maintained by software publishers
- knowledge bases.
Good documentation may exclude in many cases the need for further forms of technical support. It is, however, not easy to write. One of the reasons why this happens is that it is difficult for shareware authors or other software developers to put themselves into the users’ shoes, since they are already thoroughly familiar with the application.
Read Me file
The first thing every software product should have is a text format "Read Me" file that includes the following:
- Product Name and Version
- Company and Author Name
- Release date
- Description (like "photo organizer")
- A changelog (this should be a list of fixes and new features)
- System requirements (CPU, RAM, disk space, operating systems supported)
- Price, payment options and instructions
- Copyright and distribution information (rules for people who want to distribute your product)
- Contact details (email, phone, fax website and postal address)
The "Read Me" file is important because everybody who might be interested in your product is expecting it, including reviewers, users, or people who want to put your product on a CD for distribution with a magazine or on their website. The idea here is to minimize frustration associated with the information being too difficult to find, therefore you should put all in one place.
The Manual
The other thing shareware authors and software publishers need to provide with their product is the manual. The first thing you should think about when starting to write it is how your users are going to use it. Few are those that will bother reading it all before attempting to use your product. They are more likely to turn to it later, when they try to do something and cannot figure out how to do it, or when they find something they do not understand.
To help them, it is best to organize your documentation by tasks. "How to…" sections are more useful than merely documenting every command in order. Explanations are easier to understand if they are backed by pictures and diagrams, wherever possible. There should also be a chapter labeled "Troubleshooting", which provides answers to the most common problems. At first you will have to guess where those problems may occur, but a couple of upgrades to your product later, the feedback from the people who tried the product will tell you what the most common problems are.
The manual should be broken down into chapters, the first one telling what the other chapters contain, so that people could readily find what they need.
The interface
Another point worth mentionning is the interface. User friendly is not enough, the interface needs to be easy to use even if the user does not have an overall systems understanding, so screens need to be self-describing.
Online help or online documentation
There is also online help, or online documentation. The documentation put on the website for users to read has to show up in search results. It has to be organized in such a way that users, who are sure to be asking questions like "How can I…" or "Why can't I…" can find the answers quickly. Lots of examples showing how to do various tasks with the software product are also needed. A good idea is to include links to a glossary of terms that might be more difficult to understand.
* * * * * * * * * * * * * * * * * * * * *
Always bear in mind that anyone who has had a bad experience with a product tends to remember it for a long time and software is no different. That is why you should strive to make using your product as smooth an experience as possible, something proper support and documentation can help you achieve.
See also Writing Good Software Documentation.
Writing Good Software Documentation
Writing software documentation may seem extremely easy for some of us, whereas others may consider it one of the most difficult tasks they could ever be asked to do.
The generic term for this kind of writing is "technical writing". A person who does this job is generally referred to as a "technical writer", with quite extensive knowledge of software and technology and with a deeper understanding of the logic behind the software, or a "technical writer", a person who, although somewhat overwhelmed by all the denominations and the algorithms of the software, is accurate in producing a proper technical text.
Nevertheless, regardless of the orientation of the writers, be them more technical than writers, there are some things that need to be considered before, during and after the writing process.
Before Writing
· Know the Software![]()
- Training
Make sure you receive proper training for the software that you are about to document and that you have the software explained to you, step by step. - Experiment
Have the software installed on your machine; make sure you also have access to as musch as possible of the necessary software related information, and that you have access to all the functionalities of the software. Explore all its functions, and don't be afraid to ask the engineers whenever you are not certain about the influence of, let's say, an unchecked checkbox or radio button on the process thatyou are documenting. Don't assume anything, you could be wrong. - Gather information
This may mean older documents, definition documents for certain functionalities or specifications, general PowerPoint presentations, marketing documents, etc. They may help you along the way.
· Identify the Target Audience![]()
This is of utmost importance. You have to know beforehand what kind of public the document you are about to produce addresses to, so that you know how to adjust and adapt the style and the informational content of the document. Again, ask the engineers, the product managers, about the audience. You don't want to be too technical for a non-technical audience, or vice versa.
· Keep It Simple![]()
- Avoid creating a lot of styles. Too many styles can make a document hard to follow.
- Do not include header and footer in the first two pages of the document (the ones containing the name of the company that produces the application, the name of the document, date of creation, copyright issues, support department contact information, and document version history). Start using header and footer from the Table of Contents section.
- Refrain from inserting symbols (such as exploding bombs or the like) for error messages or notes.
- Use only black for text. You can highlight terms or names of buttons, menus, windows, tables, etc. by using bold letters or italics.
· Be Accurate![]()
With Text
- Respect all the documentation requests, coming either from the client or from your direct supervisor, pertaining to the contents and layout of the document.
- Always check the spelling and grammar
- Avoid ambiguous or empty phrases. Do not describe a checkbox by simply saying "Select here to do this." Explain the effect of checking or not that respective checkbox on the process that you are documenting and on the behavior of the software as a whole. Avoid describing fields by using a simple, for example, "Enter the file name", or "Enter user ID / password". You must provide more information, such as the location where files can be found or saved, the length and composition of user IDs and passwords, in what way the details provided by you in these fields will influence the evolution of the process you are documenting and the behavior of the entire software, etc.
- Describe with accuracy text fields, checkboxes, radio buttons, spin boxes, drop-down lists, etc. Do not assume that the readers will know what they are or what they should contain.
- Make sure that the names of user manuals or products that you refer to in your document are correct.
- Use a simple NOTE whenever some particular aspect needs to be brought to the reader's attention.
- Do not insult your reader's intelligence by pointing out the really obvious. For example, it suffices to state only once how to start the application. Any further reference to this inside the manual is not necessary.
- Don't burden your readers with unnecessary, irrelevant information. What you need to do is fulfill your readers' need for information on a particular topic, not boast about your vast knowledge.
- It is also preferable to express an idea in a simple way than risk an intricate, complex formulation.
- Always be careful with gender-neutral writing. Prefer using the imperative mood (Do this..), the second person pronoun (you) over the third person plural pronoun "they" as singular pronoun (mainly because many of your readers may not grasp its real meaning) or over the third person singular pronoun "he" (you may sound gender-biased) or "the user". Also, avoid such phrases as "he/she" or "he or she".
- When you have tables in your document, make sure you select from Table Properties the "Allow row to break across pages" option and, for the top row of your table, the "Repeat as header row at the top of each page" option. This way you will avoid those huge blank spaces created when a table is too big to fit in a smaller part of the page and it is automatically moved on the next page of the document.
With Pictures / Screen Shots / Diagrams
- Prefer using picture capture software over the simple, less accurate, (Alt+) Print Screen function of Windows OS.
- Use the Windows Standard color scheme for images that need to be inserted in your document, so that a later update will be easier (no need to change all the pictures) and there will be no discrepancies between the images inserted in that document by (possibly) different persons.
- Have as many fields as possible filled in the screen shots that you take, so that your readers receive enough relevant information.
- You do not necessarily have to add images of the buttons that contain only text (e.g. OK, Cancel, Apply, Advanced, etc.). Just the button's name written with bold letters should suffice. Nevertheless, you should illustrate the image-buttons.
- Do not insert the images directly from the picture capture software. Save them in a separate folder for further use.
- Use diagrams when you want to illustrate the work-flow of the application or of one part of the application that you are documenting. Also, you can use diagrams to illustrate the structure or hierarchy of the different functionalities of the software.
- Insert pictures after each step described in your document, and for each action that needs to be taken to obtain a specific result. It will be easier for your readers to follow the step-by-step approach.
- Place a caption under each of the inserted pictures, so that the readers know what they are looking at.
· Proofreading
Go over the document once or twice, to make sure that the grammar you used is accurate, that you have spelled the words right, that you haven't skipped any important information and that you have formatted all your text properly.
· Insert the Table of Contents
Once you're sure that your text is OK, insert the table of contents. It is preferable that it has no more than 3 - 4 levels, but this depends on what you deem important and how obvious you want some information to be to your readers.
· Insert the Indexes
It is now time to index the most important terms and phrases in your document. Remember to update the table of contents afterwards.
· Send the Document to be Reviewed
After checking that everything is in order, table of contents, indexes and text altogether, send the document to one of the Subject Matter Experts (SME) for review. Ask that they use the Track Changes function, so that you can see exactly what they have modified and where you should concentrate your attention.
After you receive it back, you either have to go over some of the above-mentioned steps in order to correct possible errors or fill in some information gaps, or the document will be approved and you can forward it to the proper department so that it can be distributed to customers, and you can start working on the next document.
* * * * * * * * * * * * * * * * * * * * *
All in all, it is important to always keep in mind that communication is a key factor in the work of a technical writer. Communication with the technical writing team (where it exists), with the engineers, with the SMEs, with the deployment staff, the marketing staff, sometimes even with the programmers. This is the only way that a technical writer within a company can progress and evolve into a real professional.
Thursday, April 17, 2008
DEPLOYING PROJECTS IN VS.NET 2003
Deploying projects in Visual Studio.NET is fairly straightforward. Most of the process is automated for you through some convenient wizards so it doesn't require much effort. Keep in mind, though that you probably need the Windows Component Update Beta 1 on the machine you are deploying to. I suspect you also need the Microsoft .NET Framework, as well (for now). Also note that Microsoft states that the current Deployment may not work in the future:
"Caution Installers and merge modules created with the Beta release may not be 100 percent compatible with final Visual Studio.NET versions. While we want you to explore deployment and test the technology, we also want you to make sure that you don't distribute any installers or merge modules created with this release." - MSDN
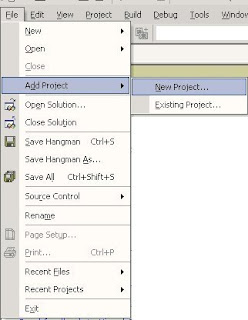
Once your application is completed in Visual Studio, you can deploy it using the following steps:
First, choose Add New Project from the File Menu:
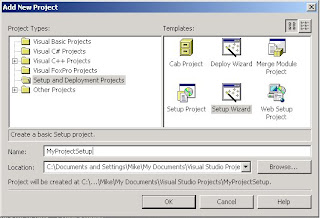
Once you've done this, choose Setup and Deployment Projects. Visual Studio then gives you a list of options for deploying your project, depending upon whether you are deploying to the web, in a compressed .cab file or as a windows setup program.
We will choose the setup wizard to deploy this particular application. The setup wizard brings up a nice step-by-step dialog for creating our setup project:
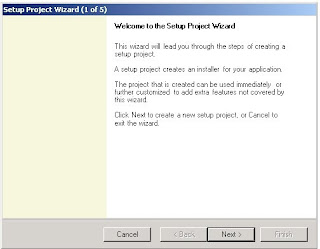
As stated in the dialog, the wizard creates an installer that you can use to install your project. The next screen asks you what kind of installer you wish to create:

We want a plain old Windows setup, so we choose setup for a rich client application. The next screen prompts us as to which files we would like installed:
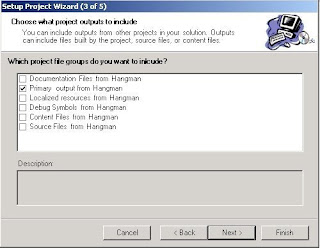
If you just want to deploy the application with no source or documentation, then just choose Primary output. This will deploy the necessary exes and dlls for your application.
The next screen prompts you for additional files such as readme.txt, web pages, or anything else you'd like to include in the install that Microsoft didn't think of. In the case of Hangman, we added the sound files:
The last screen is just a report informing you of what you've done and where the vdp (visual deployment project) is created:
When you click finish, a directory is created for deployment. Now we need to build our project in order to deploy it, so simply choose build solution from the build menu. This will create the MySetupProject.msi file needed to install the application.
If we double click on MySetupProject.msi after it is created, it will launch the installation. For most installations, this just means xcopying all the necessary files into a directory under program files. In the case of the hangman project, these would be all the System.xxx.dll's, the Microsoft.xxx.dll's (CLR Libraries), nlp files (common language resources), the runtime class library mscorlib.DLL, mngdist.dll(not sure what it does, but I guess it manages distribution), xxx.wav (sound files) and of course our own executable(In this case Hangman.exe.
"Caution Installers and merge modules created with the Beta release may not be 100 percent compatible with final Visual Studio.NET versions. While we want you to explore deployment and test the technology, we also want you to make sure that you don't distribute any installers or merge modules created with this release." - MSDN
Once your application is completed in Visual Studio, you can deploy it using the following steps:
First, choose Add New Project from the File Menu:

Once you've done this, choose Setup and Deployment Projects. Visual Studio then gives you a list of options for deploying your project, depending upon whether you are deploying to the web, in a compressed .cab file or as a windows setup program.

We will choose the setup wizard to deploy this particular application. The setup wizard brings up a nice step-by-step dialog for creating our setup project:

As stated in the dialog, the wizard creates an installer that you can use to install your project. The next screen asks you what kind of installer you wish to create:

We want a plain old Windows setup, so we choose setup for a rich client application. The next screen prompts us as to which files we would like installed:

If you just want to deploy the application with no source or documentation, then just choose Primary output. This will deploy the necessary exes and dlls for your application.
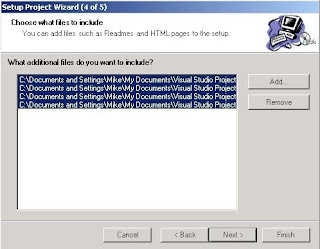
The next screen prompts you for additional files such as readme.txt, web pages, or anything else you'd like to include in the install that Microsoft didn't think of. In the case of Hangman, we added the sound files:

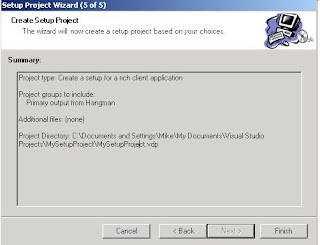
The last screen is just a report informing you of what you've done and where the vdp (visual deployment project) is created:

When you click finish, a directory is created for deployment. Now we need to build our project in order to deploy it, so simply choose build solution from the build menu. This will create the MySetupProject.msi file needed to install the application.
If we double click on MySetupProject.msi after it is created, it will launch the installation. For most installations, this just means xcopying all the necessary files into a directory under program files. In the case of the hangman project, these would be all the System.xxx.dll's, the Microsoft.xxx.dll's (CLR Libraries), nlp files (common language resources), the runtime class library mscorlib.DLL, mngdist.dll(not sure what it does, but I guess it manages distribution), xxx.wav (sound files) and of course our own executable(In this case Hangman.exe.
Tuesday, April 8, 2008
How to add AdRotator in ASP.NET using VB.NET
AdRotator is used to randomize pictures (images) whenever you load or refresh a web page. To add an AdRotator you simply have to drag a adrotator from toolbox and place it on your ASP.NET page. Then you have to add an xml file. The attributes of the xml file will be the following:
<?xml version="1.0" encoding="utf-8" ?>
<Advertisements>
<Ad>
<ImageUrl>Pix/yarn/1.gif</ImageUrl>
<AlternateText>Image is not displayed</AlternateText>
</Ad>
<Ad>
<ImageUrl>Pix/yarn/2.jpg</ImageUrl>
<AlternateText>Image is not displayed</AlternateText>
</Ad>
<Ad>
<ImageUrl>Pix/yarn/3.jpg</ImageUrl>
<AlternateText>Image is not displayed</AlternateText>
</Ad>
</Advertisements>
Now save the file with as "Ads.xml" and go back to your ASP.NET Page where you have place that AdRotator and give "Ads.xml" as a value to its AdvertisementFile attribute.
Run the page and you will see the images.
Sunday, April 6, 2008
HOW TO EMBED(ATTACH) CRYSTAL REPORT IN ASP.NET USING VB.NET
In this article I am going to describe you that how can you embed(attach) a crystal report in ASP.NET using VB.NET as a language. To embed a crystal report first you have to select a crystalreportviewer from Toolbox in ASP.NET environment and then you have to right click on the ASP.NET page and click on View Code option. When the view code page will open you will insert the following code.
Imports CrystalDecisions.CrystalReports.Engine
Imports CrystalDecisions.Shared
Partial Class _Default
Inherits System.Web.UI.Page
Protected Sub btnReportGenerate_Click(ByVal sender As Object, ByVal e As System.EventArgs) Handles btnReportGenerate.Click
Try
Dim path As String
path = Server.MapPath(Request.ApplicationPath)
Dim report As New ReportDocument
report.Load(path + "\zreport.rpt")
report.SetDatabaseLogon("sa", "52xMAX")
CrystalReportViewer1.ReportSource = report
Response.Write("report launch successfully")
Catch ex As Exception
Response.Write("Error: " & Err.Description)
End Try
End Sub
End Class
Further if you want to add a parameter to the crystal report so that only the desired data will be print then you have to use this code. But Before that you have to insert text boxes on your ASP.NET so that you will pass the selective data to the crystal report. I am writing here the VB.NET Code, you have to insert text box by your self.
Imports CrystalDecisions.CrystalReports.Engine
Imports CrystalDecisions.Shared
Partial Class _Default
Inherits System.Web.UI.Page
Protected Sub Page_Load(ByVal sender As Object, ByVal e As System.EventArgs) Handles Me.Load
If Not IsPostBack Then
crystalreportshow.Visible = False
ElseIf IsNothing(txtID.Text) Then
crystalreportshow.Visible = False
ElseIf Not IsNumeric(txtID.Text) Then
crystalreportshow.Visible = False
End If
End Sub
Protected Sub btnReportGenerate_Click(ByVal sender As Object, ByVal e As System.EventArgs) Handles btnReportGenerate.Click
Try
If IsNothing(txtID.Text) Then
Response.Write("Id must be filled")
ElseIf Not IsNumeric(txtID.Text) Then
Response.Write("ID must be in numeric")
Else
crystalreportshow.Visible = True
phase1.Visible = False
Dim path As String
path = Server.MapPath(Request.ApplicationPath)
Dim report As New ReportDocument
report.Load(path + "\zreport.rpt")
report.SetDatabaseLogon("sa", "52xMAX")
Dim crParameterFieldDefinitions As CrystalDecisions.CrystalReports.Engine.ParameterFieldDefinitions = report.DataDefinition.ParameterFields
Dim crParameter1 As CrystalDecisions.CrystalReports.Engine.ParameterFieldDefinition = crParameterFieldDefinitions.Item("id")
Dim crparameter1value As CrystalDecisions.Shared.ParameterValues = crParameter1.CurrentValues
Dim disval As New CrystalDecisions.Shared.ParameterDiscreteValue
disval.Value = txtID.Text
crparameter1value.Add(disval)
crParameter1.ApplyCurrentValues(crparameter1value)
CrystalReportViewer1.ReportSource = report
Response.Write("report launch successfully")
End If
Catch ex As Exception
Response.Write("Error: " & Err.Description)
End Try
End Sub
End Class
In this way you can insert as many parameter as you can. Remember that parameter will select there data type as you pass the data to the report.
I hope that this will help you.
Imports CrystalDecisions.CrystalReports.Engine
Imports CrystalDecisions.Shared
Partial Class _Default
Inherits System.Web.UI.Page
Protected Sub btnReportGenerate_Click(ByVal sender As Object, ByVal e As System.EventArgs) Handles btnReportGenerate.Click
Try
Dim path As String
path = Server.MapPath(Request.ApplicationPath)
Dim report As New ReportDocument
report.Load(path + "\zreport.rpt")
report.SetDatabaseLogon("sa", "52xMAX")
CrystalReportViewer1.ReportSource = report
Response.Write("report launch successfully")
Catch ex As Exception
Response.Write("Error: " & Err.Description)
End Try
End Sub
End Class
Further if you want to add a parameter to the crystal report so that only the desired data will be print then you have to use this code. But Before that you have to insert text boxes on your ASP.NET so that you will pass the selective data to the crystal report. I am writing here the VB.NET Code, you have to insert text box by your self.
Imports CrystalDecisions.CrystalReports.Engine
Imports CrystalDecisions.Shared
Partial Class _Default
Inherits System.Web.UI.Page
Protected Sub Page_Load(ByVal sender As Object, ByVal e As System.EventArgs) Handles Me.Load
If Not IsPostBack Then
crystalreportshow.Visible = False
ElseIf IsNothing(txtID.Text) Then
crystalreportshow.Visible = False
ElseIf Not IsNumeric(txtID.Text) Then
crystalreportshow.Visible = False
End If
End Sub
Protected Sub btnReportGenerate_Click(ByVal sender As Object, ByVal e As System.EventArgs) Handles btnReportGenerate.Click
Try
If IsNothing(txtID.Text) Then
Response.Write("Id must be filled")
ElseIf Not IsNumeric(txtID.Text) Then
Response.Write("ID must be in numeric")
Else
crystalreportshow.Visible = True
phase1.Visible = False
Dim path As String
path = Server.MapPath(Request.ApplicationPath)
Dim report As New ReportDocument
report.Load(path + "\zreport.rpt")
report.SetDatabaseLogon("sa", "52xMAX")
Dim crParameterFieldDefinitions As CrystalDecisions.CrystalReports.Engine.ParameterFieldDefinitions = report.DataDefinition.ParameterFields
Dim crParameter1 As CrystalDecisions.CrystalReports.Engine.ParameterFieldDefinition = crParameterFieldDefinitions.Item("id")
Dim crparameter1value As CrystalDecisions.Shared.ParameterValues = crParameter1.CurrentValues
Dim disval As New CrystalDecisions.Shared.ParameterDiscreteValue
disval.Value = txtID.Text
crparameter1value.Add(disval)
crParameter1.ApplyCurrentValues(crparameter1value)
CrystalReportViewer1.ReportSource = report
Response.Write("report launch successfully")
End If
Catch ex As Exception
Response.Write("Error: " & Err.Description)
End Try
End Sub
End Class
In this way you can insert as many parameter as you can. Remember that parameter will select there data type as you pass the data to the report.
I hope that this will help you.
Subscribe to:
Posts (Atom)